Nikon D80 HDR bracketing tutorial
Recently I dived into High Dynamic Range photography (also known as HDR) using my Nikon D80.
My interest for the HDR technology is the capability to produce images that would be almost impossible to take with a digital camera. An HDR image reveals details in the light and dark areas of your images.
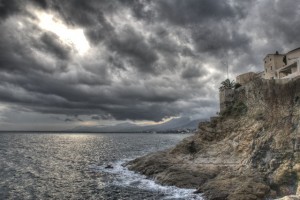
For instance, on this picture we can see the details in the clouds but also on the rock and it would be very hard to achieve it without HDR.
This tutorial does not explain how to create an HDR image because there are already very good tutorials on that subject, for instance you can read Vanilla Days tutorial, it is based on the Photomatix software but it does not hurt and you could use another software.
I will rather focus on explaining how to configure a Nikon D80 to leverage a built in feature called Auto Exposure Bracketing (AEB) that makes easier the creation of HDR images. I found all the relevant informations in the user manual but they were not clear enough and I had to spend some time on it in order to get it effective.
HDR imaging works by combining the same image with different exposures into a single image using an appropriate software. No need to emphasis on the fact that the images should rigorously be the same as possible. It can be done manually by shooting several times the same pictures with different exposure time and keeping the same aperture size, but it has at least two drawbacks:
- you need to physically touch the camera to change the exposure and it could change slightly the different images
- it take time to reconfigure the camera and your image may change during that time (clouds may move for instance)
The Nikon D80 has a feature called bracketing that allows to shoot three times the same pictures with the same aperture but with different exposures in that order:
- The normal image
- The underexposed image
- The overexposed image
Here is my howto for configuring the D80 appropriately:
Configure the image quality
The first step is to set the image quality to RAW. You can change it by pressing the QUAL button and rotate the the main command until you get RAW.
Configure the ISO sensitivity
Set the ISO sensitivity to the lowest value you can afford, for instance ISO 100 works well most of the time for me.
Configure the focus mode
Focus mode should be configured to manual (perhaps it’s possible to use automatic but I never tried).
Configure the mode
Set the D80 into Aperture-priority mode (A). Exposure bracketing works with that mode.
Configure the bracketing
Press the BKT button and rotate the main dial to chose 3 shoots and the sub-command dial to choose the bracketing increment with the value 2.0EV. At this moment you configured the D80 to change the exposure of the photo each time you shoot. Therefore the first picture you take is a normal one, but the second one will be underexposed by 2EV and the third one will be overexposed by 2EV. The forth one will be exposed normally.
Configure the shooting mode
The final step is to configure the shooting mode to continuous.
Et voilà!
The next time you will take a picture keep the finder pressed and the D80 will take the three shoots for you. Now it’s up to you to make great HDR pictures!
blog comments powered by Disqus
